
I couldn't help but think this dresser could use a little make over, besides, all of the other furniture in the bedroom is black. My first notion was to head on over to Pinterest.com and check out what other crafty people have done with old dressers to make them awesome. And I found some really great ideas. I really wanted to paint the dresser a bright color and finish it with Minwax Black Finishing Wax
The Paint

I read a few blog posts on how to prime the dresser and most of them suggested using Zinsser Primer
After I painted the primer on the dresser (it only took one coat) I headed to good 'ole Wal-Mart to pick up a few more painting supplies. They had the Zinsser Primer
I found a quart of Black Krylon ColorMaster Enamel on the shelf at Wal-Mart for around $10. I thought the word 'enamel' sounded exactly like what I was looking for, and the best part is that it washes up with soap and water.
Of course I was at a third store when I picked out the color for the inside of the drawers. At Lowe's I picked out the Valspar color "Rapids" #5004-10A and had it mixed in a quart of Olympic interior satin paint, because that was one of the cheapest brands available.
Here are a few of my dresser makeover painting tips:
1.) Sand it First - even if the primer says you don't need to sand it, for best results you really should. I used a 220-Grit Fine Sandpaper
2.) Use Tack Cloth - a cheap piece of Tack Cloth will lift off any dust left by the sand paper and prepare your project for primer.
3.) Use a Primer - primer is what helps your paint stick to the surface of the furniture and helps keep it from peeling and chipping later. Next time I'm going to try Zinsser

4.) Go Disposable - I chose to use inexpensive and disposable products for this project in particular because I was painting black. It just seemed like it could be a huge mess trying to wash all of that up in my kitchen sink. I wore disposable gloves, and used inexpensive paint tray liners, foam brushes and disposable rollers. And I hate to say it but I threw it all away after each coat of paint.

6.) Cut Rollers in Half - I used a roller with a 1/4" nap for this project to achieve a smooth finish. I like to buy the regular sized ones and cut them in half with a serrated knife to make them fit my 'mini' roller. Just make sure you wipe off any of the 'fuzz' before painting.
7.) Thin Coats - Save yourself a lot of headache and get a great finish by painting thin coats of paint and allowing each coat to thoroughly dry in between. You'll also avoid those pesky paint runs if you go easy on the paint. This project only took two coats of black paint.

8.) Plastic Bags - I hate washing out my paint brushes because they never seem to dry in time to use them again, making my paint watery. Also, its so hard to get all of the paint out and if you don't you end up with little rubber paint crumbs in your next paint project. My solution is to use a plastic bag. If I'm using a paint brush I just slide it down into a zipper bag, mush the paint around a little bit to cover it all and then zip it shut. If I'm using a roller, I grab an old plastic grocery bag, put it in all of the way and roll the bag around the roller. No washing, and you can reuse your same brush or roller the next day. The paint seems to stay usable for up to a week or so.
The Knobs
I had originally decided to pitch the 1970's drawer pulls that were on the dresser and go for something brighter and more modern. I was thinking a brushed nickel cup drawer pull like THIS

They actually painted up really nice! I even had a can of $.99 glossy black spray paint on hand. The glossy drawer pulls are a nice, but subtle contrast to the satin paint on the dresser. I would have loved to paint these knobs hot pink or teal blue but, again not knowing baby's gender, it's kind of hard to do. I guess I can always take them off and paint them again later! ;)
The Drawers
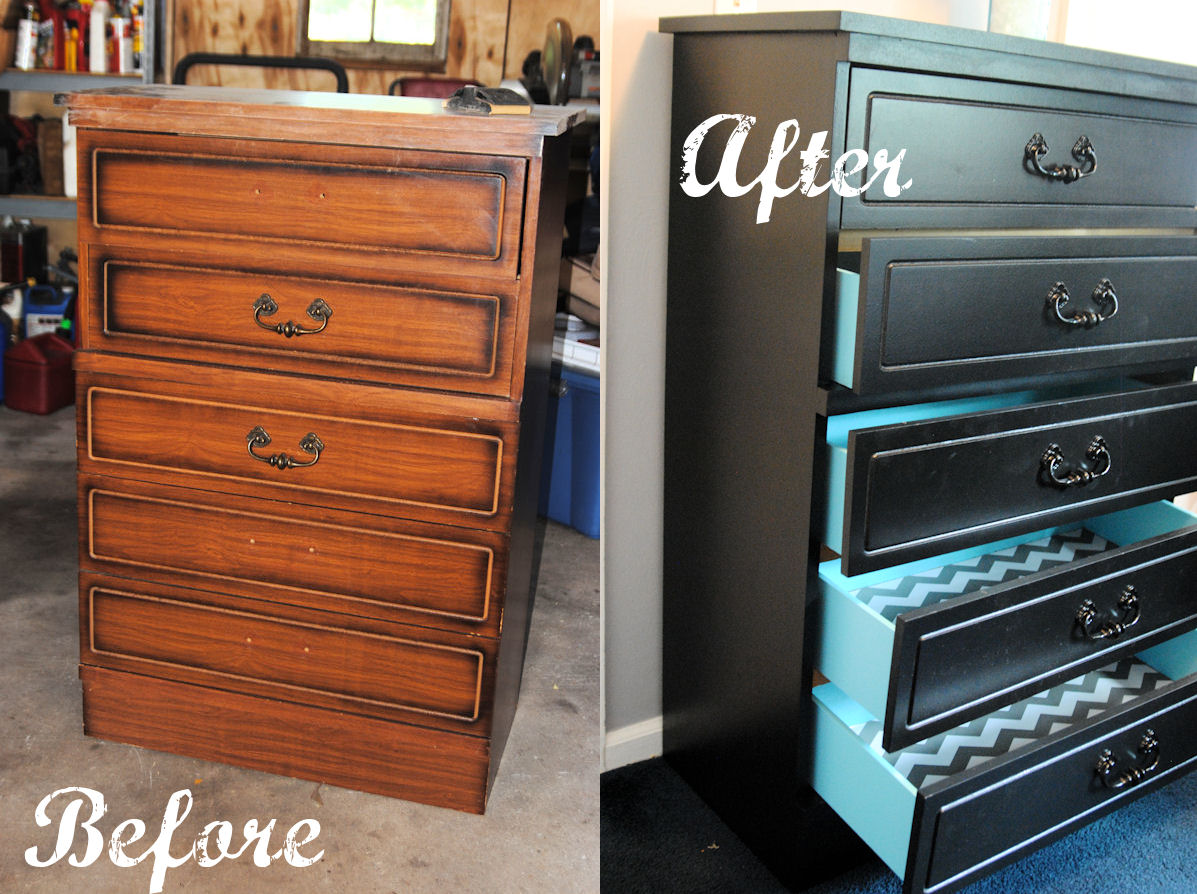
And now onto my favorite part of the project! A surprise splash of color on my seemingly all black dresser. I decided to paint the inside of the drawers a beautiful seafoam/teal/aqua color (I never know how to describe it) called "Rapids". I figure the color is pretty gender neutral and it's one of my favorites. The best part of the drawers is, I found this awesome Gray Chevron Self Adhesive Shelf Liner to line the drawers with! The best price I could find on this stuff was on Amazon.com for $11.99 and since I currently have a free trial of Prime I got it shipped for free :D

I painted the inside of the drawer fronts black and the sides teal. I was careful to cut the paint in and not paint on the drawer bottoms. Later I found out that I should have done a little over painting because it's super hard to make the contact paper go all of the way to the edges on every side. Lesson learned.

The Finished Product
Here it is! I'm totally thrilled with how this dresser makeover turned out and can't wait to start using it! I guess I better get to washing baby clothes; only 5 more weeks!


LOVE this Dana! Well done :-) I will definitely be using your tips soon, as I plan to refinish a few of our bathroom cabinets. It's scary, but you've paved the road nicely! Thanks. ~ Angela Bennett
ReplyDeleteBake your spray painted hardware at lowest temp your oven will go for a few hours--- prevents chipping.
ReplyDeleteDid you use something else for a final coat after the Krylon black paint?
ReplyDeleteI didn't put anything over the black Krylon on this dresser, but the next piece I re-do I will for sure put on a clear coat to add to the durability.
ReplyDeleteLOOKS FAB-TABULOUS!
ReplyDeletehttps://bayanlarsitesi.com/
ReplyDeleteCihangir
Heybeliada
Yalova
Adana
35C
yozgat
ReplyDeletesivas
bayburt
van
uşak
VK1U
Bolu Lojistik
ReplyDeleteMardin Lojistik
Kocaeli Lojistik
Diyarbakır Lojistik
İstanbul Lojistik
NM8TLT
amasya evden eve nakliyat
ReplyDeleteeskişehir evden eve nakliyat
ardahan evden eve nakliyat
manisa evden eve nakliyat
karaman evden eve nakliyat
U4T
https://istanbulolala.biz/
ReplyDelete25G
urfa evden eve nakliyat
ReplyDeletemalatya evden eve nakliyat
burdur evden eve nakliyat
kırıkkale evden eve nakliyat
kars evden eve nakliyat
EYHFO
D5E71
ReplyDeleteÇerkezköy Çatı Ustası
Tokat Evden Eve Nakliyat
Eskişehir Evden Eve Nakliyat
Denizli Evden Eve Nakliyat
Kripto Para Nedir
7C079
ReplyDeleteAntep Evden Eve Nakliyat
Mardin Evden Eve Nakliyat
Osmaniye Lojistik
Karaman Parça Eşya Taşıma
Muş Evden Eve Nakliyat
83859
ReplyDeleteEdirne Şehir İçi Nakliyat
Sincan Parke Ustası
Sincan Boya Ustası
Sivas Parça Eşya Taşıma
Samsun Lojistik
Rize Evden Eve Nakliyat
Etlik Parke Ustası
Mamak Boya Ustası
Tekirdağ Lojistik
283D0
ReplyDeleteÇerkezköy Çilingir
Hatay Şehir İçi Nakliyat
Kalıcı Makyaj
Urfa Lojistik
Mardin Şehir İçi Nakliyat
Siirt Şehir İçi Nakliyat
Şırnak Şehirler Arası Nakliyat
Hatay Parça Eşya Taşıma
Bitlis Parça Eşya Taşıma
47FF1
ReplyDeleteMardin Şehir İçi Nakliyat
Sivas Şehirler Arası Nakliyat
Big Wolf Coin Hangi Borsada
Yozgat Evden Eve Nakliyat
Kayseri Evden Eve Nakliyat
İstanbul Evden Eve Nakliyat
Btcst Coin Hangi Borsada
Samsun Parça Eşya Taşıma
Casper Coin Hangi Borsada
82738
ReplyDeleteOrdu Şehirler Arası Nakliyat
Iğdır Parça Eşya Taşıma
Ünye Petek Temizleme
Maraş Parça Eşya Taşıma
Sincan Parke Ustası
Adana Şehirler Arası Nakliyat
Çerkezköy Petek Temizleme
Afyon Evden Eve Nakliyat
Bayburt Parça Eşya Taşıma
58E28
ReplyDeleteAfyon Şehirler Arası Nakliyat
Bitcoin Nasıl Alınır
Yalova Şehirler Arası Nakliyat
Hakkari Lojistik
Hotbit Güvenilir mi
Denizli Şehir İçi Nakliyat
Kırklareli Parça Eşya Taşıma
Kastamonu Şehir İçi Nakliyat
Gümüşhane Evden Eve Nakliyat
CF90B
ReplyDeleteUrfa Şehirler Arası Nakliyat
Çerkezköy Ekspertiz
Muş Evden Eve Nakliyat
Lovely Coin Hangi Borsada
Hakkari Evden Eve Nakliyat
Çorum Lojistik
Aksaray Şehirler Arası Nakliyat
Çerkezköy Çamaşır Makinesi Tamircisi
Mersin Şehir İçi Nakliyat
A854D
ReplyDeleteBitcoin Nasıl Üretilir
Bulut Madenciliği Nedir
Binance Sahibi Kim
Bitcoin Kazanma
Bitcoin Üretme Siteleri
resimli magnet
Coin Nasıl Oynanır
Coin Madenciliği Siteleri
Kripto Para Kazanma
9503C
ReplyDeleteCoin Nasıl Alınır
resimlimagnet
Bitcoin Çıkarma
Coin Çıkarma
Coin Nasıl Alınır
Bitcoin Kazanma Siteleri
Binance Nasıl Kayıt Olunur
Coin Nedir
Kripto Para Kazanma
36B99
ReplyDeletesohbet chat
çanakkale ücretsiz sohbet uygulamaları
eskişehir sohbet
nevşehir en iyi ücretsiz sohbet uygulamaları
sohbet
balıkesir ücretsiz sohbet sitesi
sesli sohbet uygulamaları
rastgele sohbet odaları
görüntülü sohbet sitesi
0B4D4
ReplyDeletecanlı sohbet
parasız sohbet siteleri
burdur mobil sohbet siteleri
Mardin Parasız Görüntülü Sohbet
bartın mobil sohbet siteleri
Nevşehir Canlı Sohbet Et
kadınlarla ücretsiz sohbet
trabzon sesli sohbet uygulamaları
canlı görüntülü sohbet uygulamaları
0C3DE
ReplyDeleteAydın Bedava Sohbet Uygulamaları
agri yabancı canlı sohbet
sivas ücretsiz sohbet
Kastamonu Kadınlarla Görüntülü Sohbet
elazığ rastgele görüntülü sohbet
sakarya canlı görüntülü sohbet uygulamaları
Kırşehir Mobil Sohbet Sitesi
canlı sohbet ücretsiz
ankara mobil sohbet
829AD
ReplyDeleteBitcoin Üretme Siteleri
Clubhouse Takipçi Hilesi
Kripto Para Nasıl Alınır
Keep Coin Hangi Borsada
Twitch İzlenme Satın Al
Twitch Takipçi Satın Al
Tiktok İzlenme Satın Al
Twitter Retweet Satın Al
Facebook Sayfa Beğeni Hilesi
4502D
ReplyDeleteTesla Coin Hangi Borsada
Binance Hangi Ülkenin
Bitcoin Nedir
Paribu Borsası Güvenilir mi
Telegram Abone Satın Al
Mexc Borsası Güvenilir mi
Anc Coin Hangi Borsada
Fuckelon Coin Hangi Borsada
Bitcoin Kazma
E1BC0
ReplyDeletePeriscope Takipçi Satın Al
Linkedin Takipçi Satın Al
Mexc Borsası Kimin
Görüntülü Sohbet Parasız
Flare Coin Hangi Borsada
Clysterum Coin Hangi Borsada
Lovely Coin Hangi Borsada
Linkedin Beğeni Hilesi
Binance Hesap Açma
0FFCF
ReplyDeleteParibu Borsası Güvenilir mi
Spotify Dinlenme Satın Al
Twitter Trend Topic Satın Al
Binance Hesap Açma
Coin Çıkarma Siteleri
Ön Satış Coin Nasıl Alınır
MEME Coin Hangi Borsada
Parasız Görüntülü Sohbet
Hexa Coin Hangi Borsada
77383
ReplyDeletekraken
mexc
kizlarla canli sohbet
ilk kripto borsası
mexc
probit
gate io
bitexen
kraken
194F536C3B
ReplyDeletewhatsapp show siteleri
5D66F5D3DF
ReplyDeleteşov
steroid satın al
görüntülü show
cialis
www.ijuntaxmedikal.store
steroid satın al
6582E6FF58
ReplyDeletedüşmeyen gerçek takipçi